
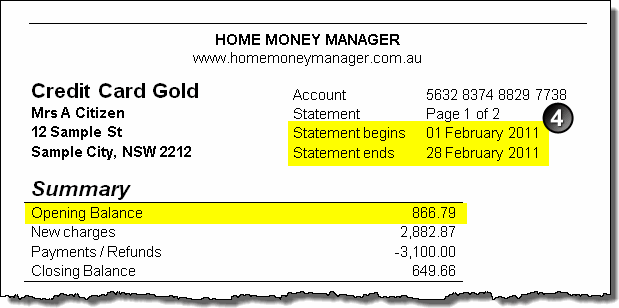
Most of the information you need to enter into the software is available on the statements sent to you by your account provider. While statements vary slightly from bank to bank, they generally contain the following information:

The rest of this help topic will show you how to add this sample statement to the software.
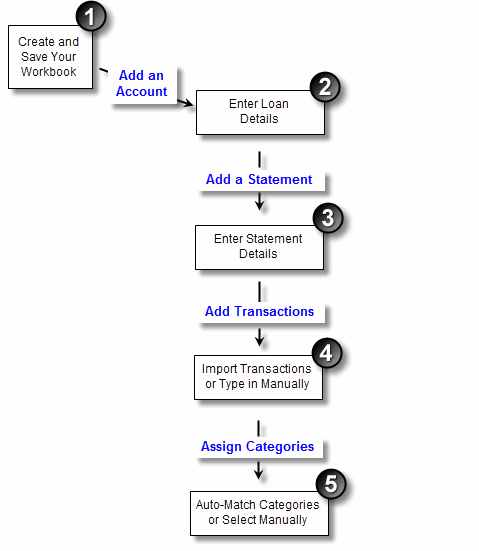
The first step to entering your account details is to (1) set up your own workbook to hold your information. You can then (2) add your first credit card account, which will hold each of your (3) statements. (4) Add transactions to each statement - by importing them from your Internet banking site or by typing them in manually, and then the final step is to(5) assign categories to your transactions - using the Auto-Matching tool or by selecting them manually.
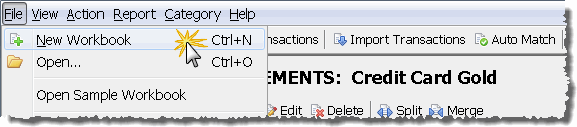
Before you can start entering your credit card details into the software you need to set up your own workbook to store them in. From the file menu select the New Workbook option.
Tip - The user option "Open Last Workbook At Start Up" allows you to automatically open you workbook each time you start the software, and by default this option is enabled.
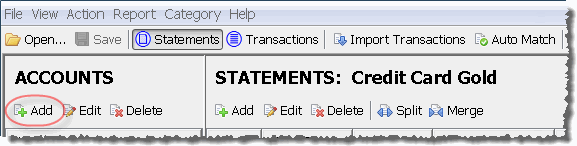
Once you have set up your workbook, you can add your first credit card. Click on the Add button under the ACCOUNTS heading to open the account details screen.
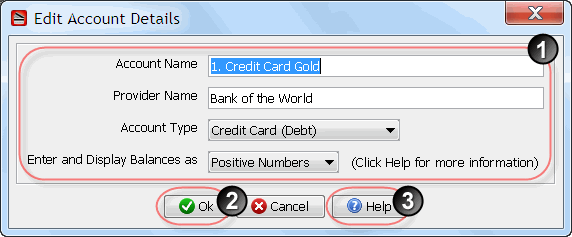
To set up an account all you need to do is enter your credit card details into the screen (1). Once you have finished click on the Ok button (2) to create the account.
Tip - As you work with the software you will find Help buttons (3) on each of the screens which will provide you with more instructions for the screen you are currently working with.
For each statement you receive from your lender, you need to set up a statement in the software. To add the statement check that you are currently in the statement view (1), and then click on the Add button (2) to open the statement details screen.
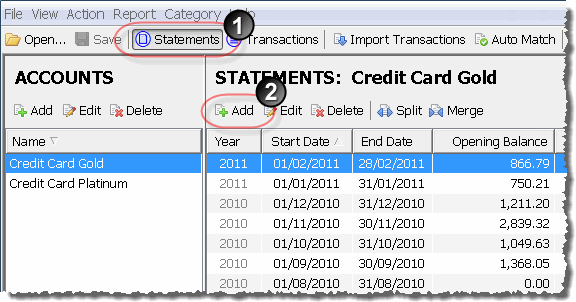
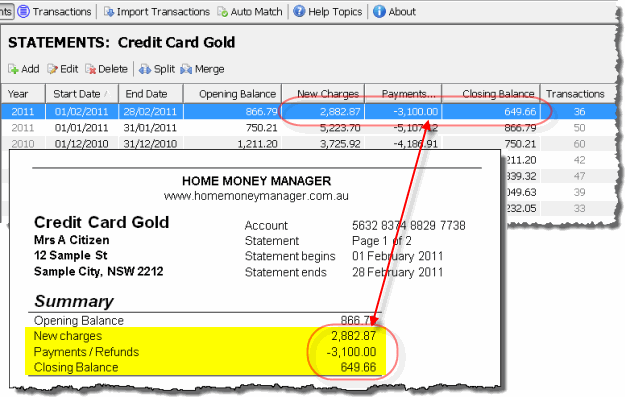
To create the statement you need to enter the statement start date, end date, reporting year and the opening balance(3) .
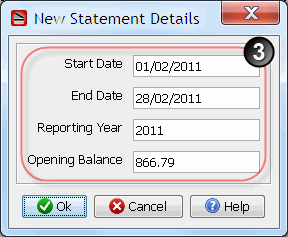
Using the information from our sample statement above, you can find the start date, end date and opening balance (4). The reporting year is used by the reports to determine which yearly totals the statement should be included in, and you can set it to any value you want. As the start and end date for this statement are both in 2011, we have set the reporting year to 2011.
Once you have entered your statement details click on the Ok button to add the statement to the account. It will now appear in the statements view (5) . NOTE: As we are working with the existing "Credit Card Gold" account from the sample workbook there are already 6 statements in the account. When you set up your first statement, there will only be one in the statement view.

When entering statements you are not required to enter the Closing Balance, as it is automatically calculated by adding the New Charges and Payments/Refunds amounts to the Opening Balance. As we have not yet added any transactions to our new statement, the New Charges and Payments/Refunds amounts are both 0.00, and the closing balance is the same as the opening balance (6).
Now that the statement has been set up we can enter the transactions. Switch to the transaction view (1) and check that you are working with the correct statement (2). The transaction view will show you the transactions you have entered for a statement and as we are yet to enter any transactions the screen is blank (3).
![]()
There are two ways you can add your transactions to the statement, you can type them in, or you can import them from a file. If you wish to manually type in your transactions click on the Add button (4) and use the information from your printed statements. In this example we are going to import the transactions from a file, therefore we will click on the Import Transactions button (5). Full instructions on how to use the import wizard, including step-by-step instructions on how to load the statement for this example, can be found in the importing transactions help topic.
![]()
After starting the import wizard and working through the required steps, the transactions are automatically loaded into the statement. They are now visible in the transactions view screen (6), the statement description has been updated to include the number of transactions loaded, "(36 transactions)" (7), and the software is waiting for you to select a category for each of your transactions (8).
![]()
By assigning categories to your transactions, the reports can group and total the information on the credit card statements.
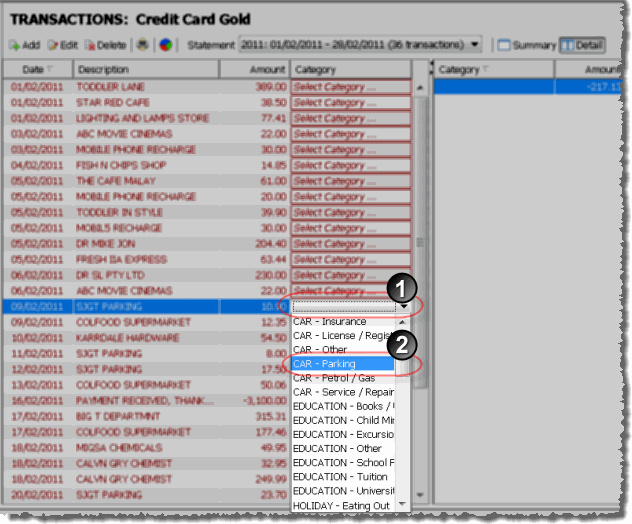
To manually select a category for a transaction, click on the transaction category you wish to change (1) and choose a category from the list (2).
Tip - You can modify the existing categories, and add your own, by selecting the Maintain Categories option from the Category menu.
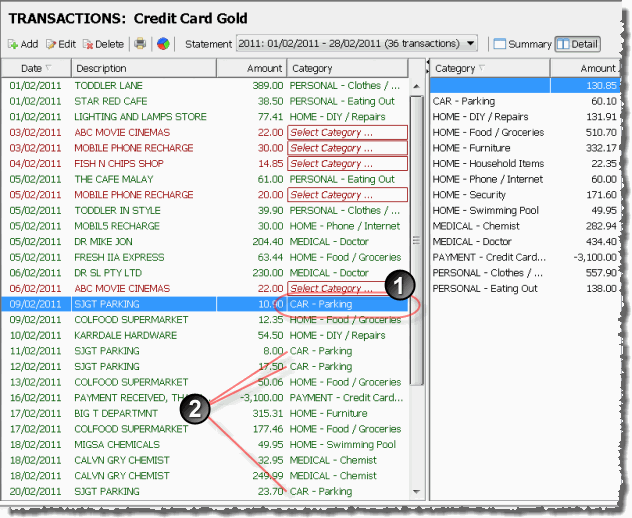
One of the unique features of this software is the "Auto-Matching" tool, which will save you having to manually select categories for every transaction. It is designed to detect patterns in the categories you are manually selecting, and then automatically match categories for you.
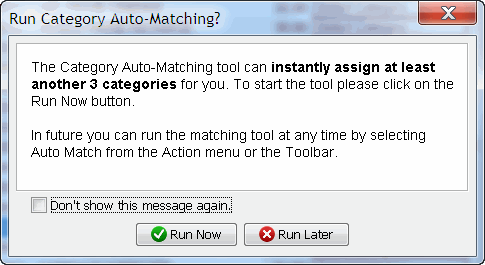
For example, when the category "CAR - Parking" is assigned to the first "SJGT PARKING" transaction in the statement (1), the software detects that there are another three parking transactions (2) in the statement that it can automatically match. If you choose to run the tool, it will update the categories on the other parking transactions, as well as any other transactions it can match.
You can see in the example below that after running the "Auto-Matching" tool all of the transactions except for five have now been matched. Full details on the category auto matching process can be found in the category auto matching help topic.
After manually assinging categories to the remaining five transactions, you can review the category totals for the statement. By clicking on the Amount column (1) you can sort the categories totals, instantly showing you where you have spent your money (2). You can also switch between a summary and detailed view of the category totals (3).
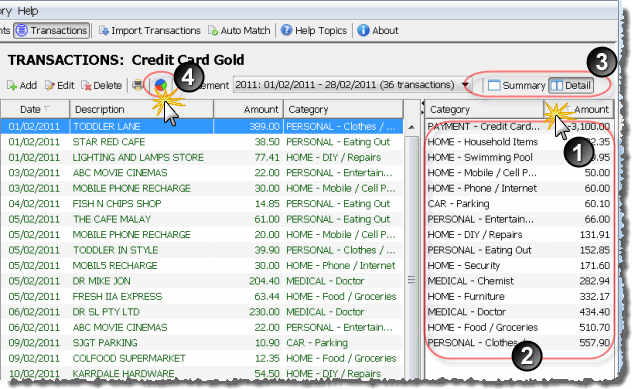
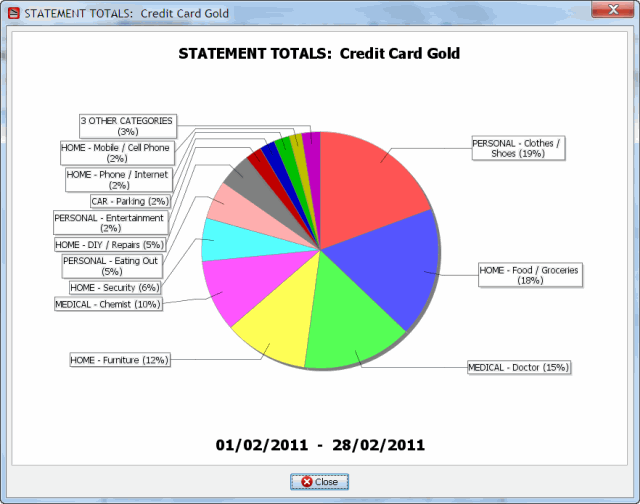
To review your credit card expenses in a chart, simply click on the chart button (4).
After you have added the transactions to the statement, you can return to the statement view screen and review the New Charges and Payment/Refund amounts, and check that the closing balance matches the balance on the printed statement.
Continue adding your statements from oldest to newest, entering the transactions and assigning categories to each one.
For instructions on loading your transactions from your Internet banking site, refer to the importing transactions help topic.
For more information on the other credit card reports available in the software, refer to reports help topic.